| The Dark Priests | ||||||||||||
 | ||||||||||||
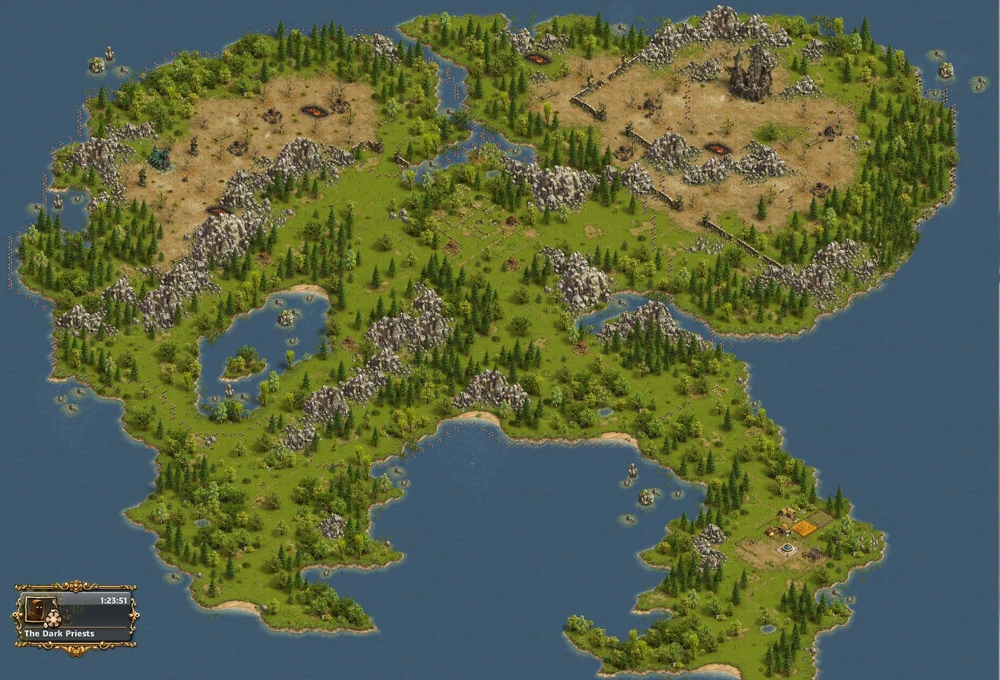
| Rumour has it that a couple of dark priests are performing dark rituals. Very dark rituals. There have even been several cats reported missing recently. Understandably, your citizens are more than a little concerned about this. They have turned to you for help and are willing to give what they have in order to compensate you for your efforts. | ||||||||||||
| ||||||||||||
| V • E • D | ||||||||||||
Description[]
A fairly easy map that requires moving your camps right from the start to give direct attack routes to the Leaders Camp and avoid a lot of costly battles.
Along with Witch of The Swamp it should be a staple XP farming map for any player. You will find this map rather often when you do short adventure searches and is fairly cheap to purchase from the trade system.
Availability[]
Level: 26
Merchant: N/A
Adventure Search: Short (?.??%), Medium (?.??%)
Trade: ~ 80-90

Maps[]
  Map of The Dark Priests |
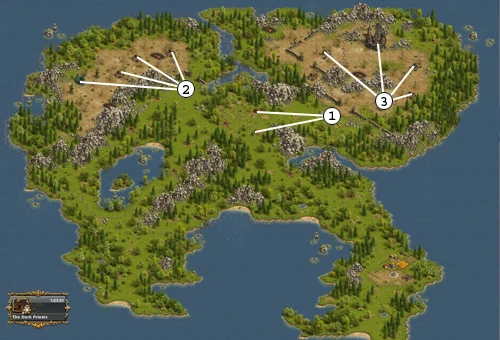  Camp Sequence Guide |
Requirements[]
| General Type | Requirements | ||||||||
|---|---|---|---|---|---|---|---|---|---|
| Total | |||||||||
| Normal General (200 troops) | 299-879 | 0-18 | 0-11 | 199-258 | 0-140 | 100 | 0-48 | 0-50 | 598-1504 |
| Lord Dracul (200 troops) | ??? | ??? | ??? | ??? | ??? | ??? | ??? | ??? | ??? |
| Master of Martial Arts (220 troops) | 257-420 | 0-28 | - | 212 | - | 170-176 | 0-195 | - | 639-981 |
| Veteran General (250 troops) | 291-594 | 0-37 | - | 249-269 | 0-90 | 195 | 0-138 | - | 735-1323 |
| Major General (270 troops) | 286-563 | 0-37 | - | 260-302 | 0-90 | 195 | 0-138 | - | 741-1325 |

Achievements[]
| Name | Requirements | Trophies | Reward |
|---|---|---|---|
| Fast Ritual | Complete "The Dark Priests" in less than 8 hours | 40 | |
| Hex of Speed | Complete "The Dark Priests" in less than 2 hours | 100 | 150 |
| Incorruptible Minds | Complete "The Dark Priests" while only losing Recruits | 100 | |
| Close-Up Blessings | Complete "The Dark Priests" without using any ranged units | 80 |
Guide[]
Refer to the Combat page for more information.
Generally, the lowest quantity/cost troop combination is listed but higher cost/value troops can be substituted to boost the odds toward losing 1-2 less troops. So use of elite soldiers, longbowman and crossbowman is at your discretion but most likely will not change the outcome very much depending for any particular battle. Likewise, more troops than listed can be sent if capacity of the general permits but in most cases will not affect the outcome.
Additional guides for The Dark Priests available here.
| Sector | Enemy | Attack With | Average Losses | Map Area |
|---|---|---|---|---|
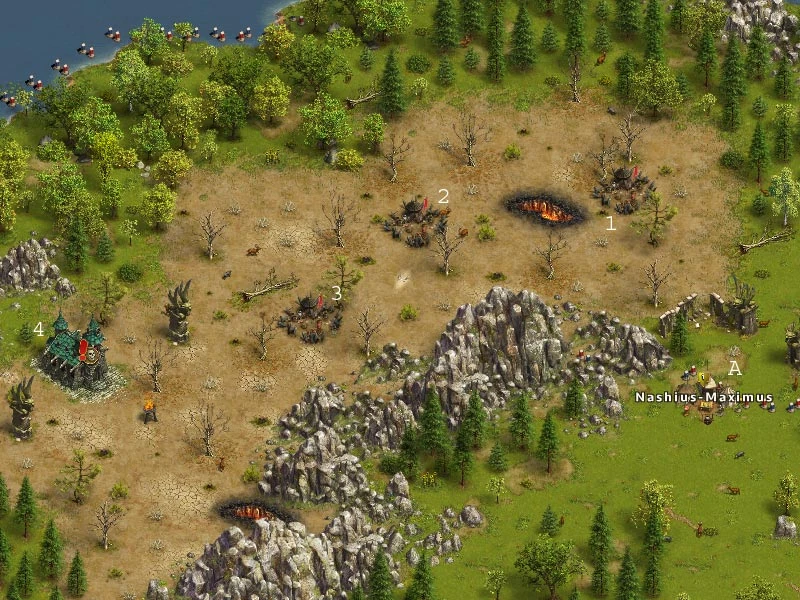
| Sector 1 | Move immediately to the entrance of Sector 3. You can take out both Sector 1 Leader and start the assault on Sector 3 from here (see map). | 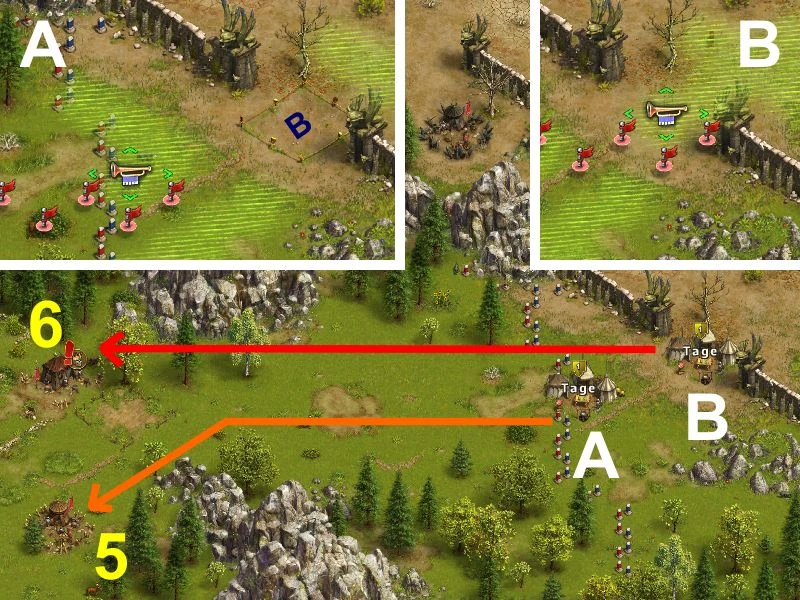  Block 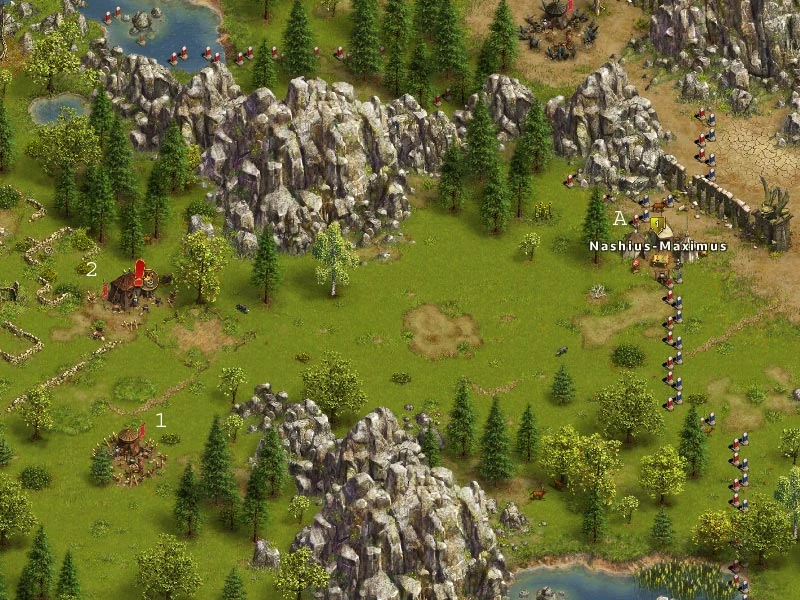  | ||
| 10 20 (Can be blocked) |
18 40 | 15 | ||
| 12 28 | 11 | |||
| No additional advantage, use basic general option(s) above | ||||
| No additional advantage, use basic general option(s) above | ||||
| Skunk 10 20 20 |
40 100 | 33 | ||
| 37 163 | 30 | |||
| 20 170 | 16 | |||
| 40 195 | 32 | |||
| No additional advantage, use veteran general option(s) above | ||||
| Sector 2 | Move as far NWW as possible so your general is near the entrance to Sector 2. Note: You can skip the second camp (30 Priest + 30 Shadowsneaker) and just send 60 Recruits + 140 Soldiers against the third camp (30 Cultists + 20 Shadowsneaker + 10 Firedancer). This will take out both camps, saving you a few minutes for no extra loss. |
  | ||
| 30 40 | 5 1 194 | 4 | ||
| 3 1 196 | 3 | |||
| 1 194 | 0 | |||
| 1 249 | 0 | |||
| No additional advantage, use veteran general option(s) above | ||||
| 30 30 | 32 30 | 32 | ||
| Alternate: 1 109 | 18 | |||
| 17 8 | 16 | |||
| No additional advantage, use basic general option(s) above | ||||
| No additional advantage, use basic general option(s) above | ||||
| 30 20 10 | 27 63 | 26 | ||
| Alternate: 1 199 | 12 | |||
| 17 33 | 15 | |||
| 27 63 | 26 | |||
| No additional advantage, use veteran general option(s) above | ||||
| Church Swamp Witch 40 20 30 |
80 11 1 50 58 | 80 6 14 | ||
| Achievement: W1: 92 W2: 200 W3: 110 90 |
W1: 92 W2: 200 W3: 107 | |||
| W1: 92 W2: 44 176 |
W1: 92 W2: 44 | |||
| Alternate: 65 10 145 |
58 6 | |||
| 65 95 90 | 61 12 | |||
| Alternate: 50 100 40 60 |
45 12 | |||
| Alternate: 108 20 102 |
106 13 | |||
| Alternate: W1: 92 W2: 45 95 100 |
W1: 92 W2: 42 12 | |||
| Achievement: W1: 92 W2: 121 129 |
W1: 92 W2: 106 | |||
| 62 1 90 117 | 58 12 | |||
| Alternate: 47 1 40 60 122 |
44 12 | |||
| Alternate: 108 20 102 |
106 13 | |||
| Achievement: W1: 92 W2: 92 178 |
W1: 92 W2: 90 | |||
| Sector 3 (Optional) |
Defeating the two leader camps to the left and right of the dark castle is not required to complete the adventure. But defeat them for maximum XP reward. | 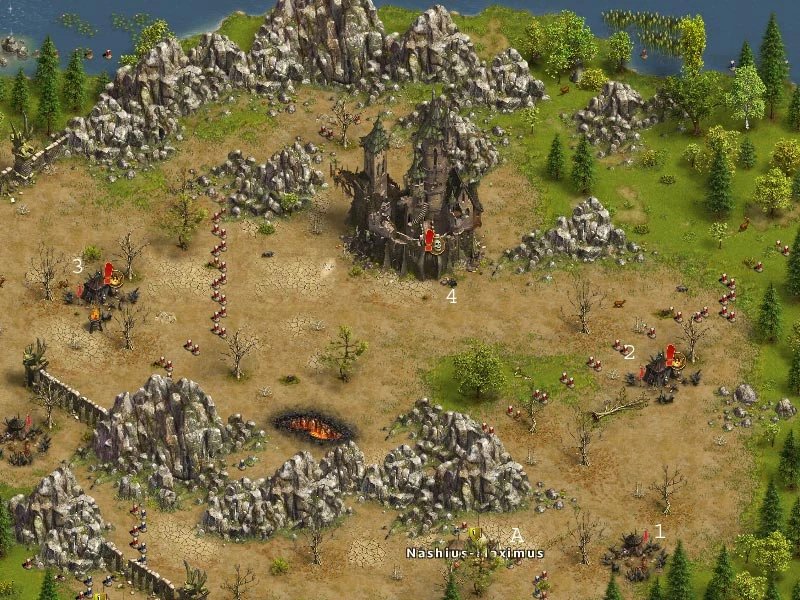  | ||
| 60 20 | 16 1 183 | 15 | ||
| 14 1 185 | 13 | |||
| 7 1 212 | 6 | |||
| 11 239 | 9 | |||
| 9 1 260 | 7 | |||
| 25 25 10 30 545 xp |
55 70 | 52 | ||
| Alternate: 7 1 192 |
6 15 | |||
| 39 41 | 35 | |||
| Alternate: 210 | 15 | |||
| 55 70 | 52 | |||
| Alternate: 1 249 |
15 | |||
| No additional advantage, use veteran general option(s) above | ||||
| 30 10 50 620 xp |
62 48 | 58 | ||
| Alternate: 1 199 |
18 | |||
| 48 17 | 42 | |||
| No additional advantage, use basic general option(s) above | ||||
| No additional advantage, use basic general option(s) above | ||||
| Dark Castle | Dark High Priest 40 40 40 |
W1: 134 W2: 23 1 140 |
W1: 134 W2: 23 |
|
| Alternate: 133 1 18 48 |
130 12 | |||
| Alternate: 136 1 50 |
133 | |||
| Achievement: W1: 108 W2: 114 86 |
W1: 108 W2: 111 | |||
| 71 1 18 110 | 69 12 | |||
| Achievement: 124 86 |
119 | |||
| 83 1 17 138 | 83 12 | |||
| Achievement: 136 99 |
133 | |||
| No additional advantage, use veteran general option(s) above | ||||
| Total Average Losses | 283-853 0-12 0-6 0-77 |
|||
| 233-396 0-18 0-15 | ||||
| 268-555 0-25 0-57 | ||||
| 265-537 0-25 0-57 | ||||
Video Guides[]
The Dark Priest lvl36+, 1 BH General, 2 Blocks

Blocks[]
- Note: A player can use the blocking technique on the first camp (either type A or B) to allow second general to kill leader camp. By doing so, you will save between 14R-15R (using block A and B respectively):
Block A) - You will need to place your generals as can be seen in the picture. Once both generals are ready to attack (units assigned: general A with 1R and general B with 40R+160S or 200R), attack camp A (20thug and 10 Dogs) with general A. Wait for 5 - 7 seconds and then immediately send general B to attack camp B (Skunk, 20 Thug, 20 Ranger, 20 Dog).
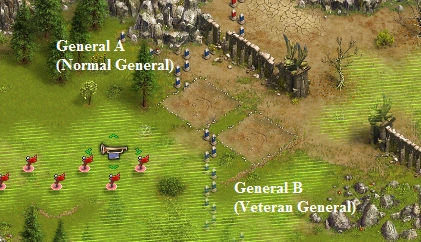

Block B) - Use the same placement as block A, but you 'MUST use a normal general as general A, 'and veteran general as general B. Unit assignments are:
General A: 18R 40S -> camp A 20 Thug, 10 Dog
General B: 90R 160S -> Skunk, 20 Thug, 20 Ranger, 20 Dog
Send general A to camp A, wait 5- 7 seconds and then immediately send general B. What should happen is that your general A will battle camp A before general B get intercepted. This will allow general B (your veteran general) to attack directly to leader camp, and destroy the camp before general A kills camp A. The result would be both camps will be destroyed and sector 1 cleared, with general A and his units left untouched. (No unit lost nor injured general).
Other Guides[]
| Minion79's Crossbow Map Minion79 has created a great map which shows troop numbers to use for each camp when using a Veteran with Crossbows. |
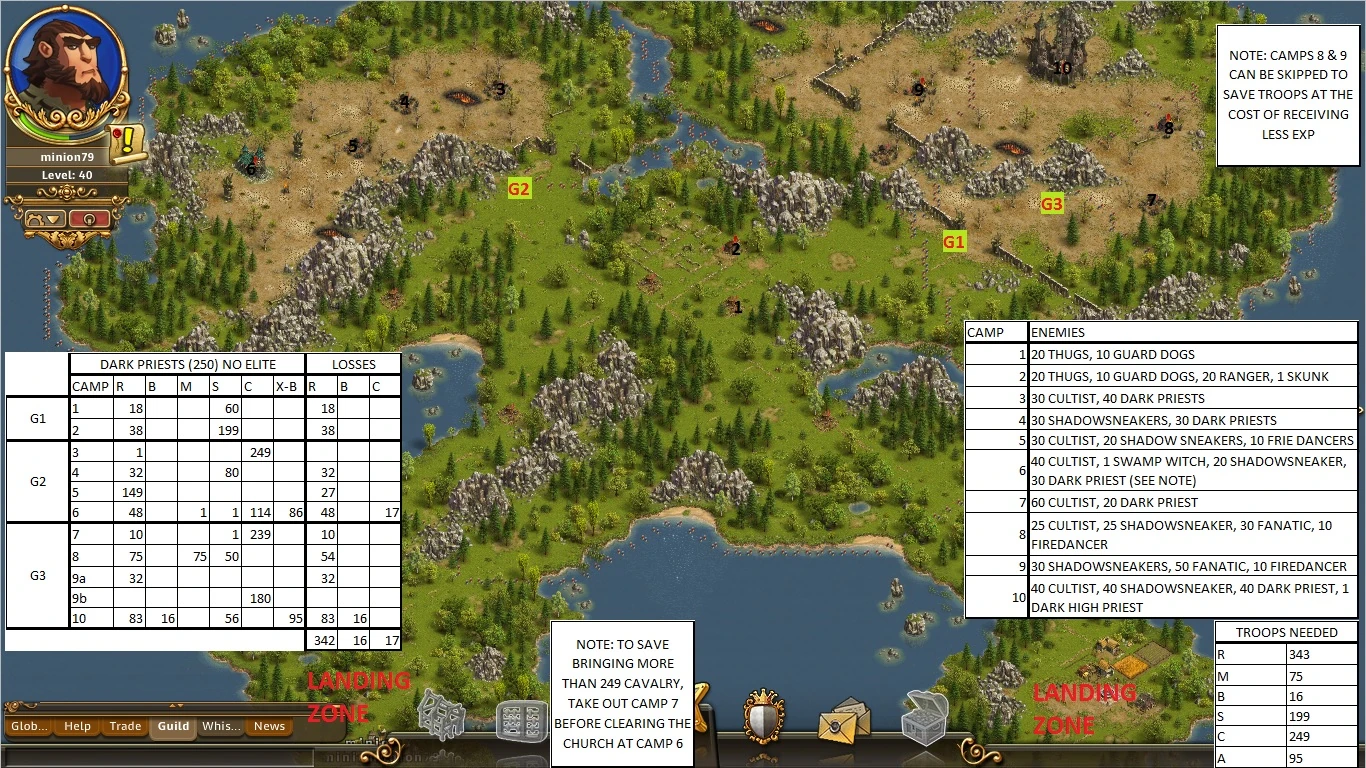
|
Enemies[]
The following enemies are found in the The Dark Priests adventure:
|
|
|
|
|
|
|
|
|
|
|
|
|


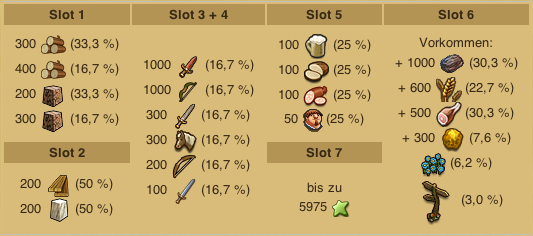
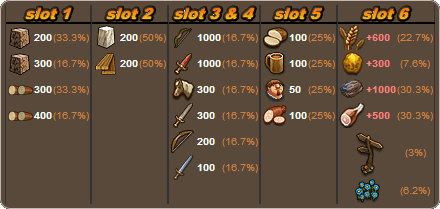
Rewards[]
