| The Invasion of the Nords | ||||||||||
 | ||||||||||
| One of our traders just arrived back from Nearpole Island and has some grave news! He claims the most feared Nords have invaded the island and bought a cold wind along with them! They came from the northern islands that were believed to be buried under the ice. We need to head to Windy Island and see what's happening! | ||||||||||
| ||||||||||
| V • E • D | ||||||||||
Description[]
The Invasion of the Nords is a tough, single-player Adventure, which uses a snowy version of the map found in The Nords Adventure, with extra frozen 'bridges' in several places. It was introduced onto the Test Server on Tuesday 6th August 2013, but it had been exclusively available on the German servers for several months before that, and had appeared on the Test Server for a short time, before then.
Requirements[]
The table below shows how many troops you should expect to bring for each general type. As some of the camps in this adventure are difficult to conquer with a normal general, troop numbers are only shown for Veteran or Major generals.
| General Type | Troops Required | Expected Losses |
|---|---|---|
| Normal | unknown | unknown |
| Veteran | 129 419 236 72 1 246 | 129 412 72 |
| Major | unknown | unknown |
Map[]
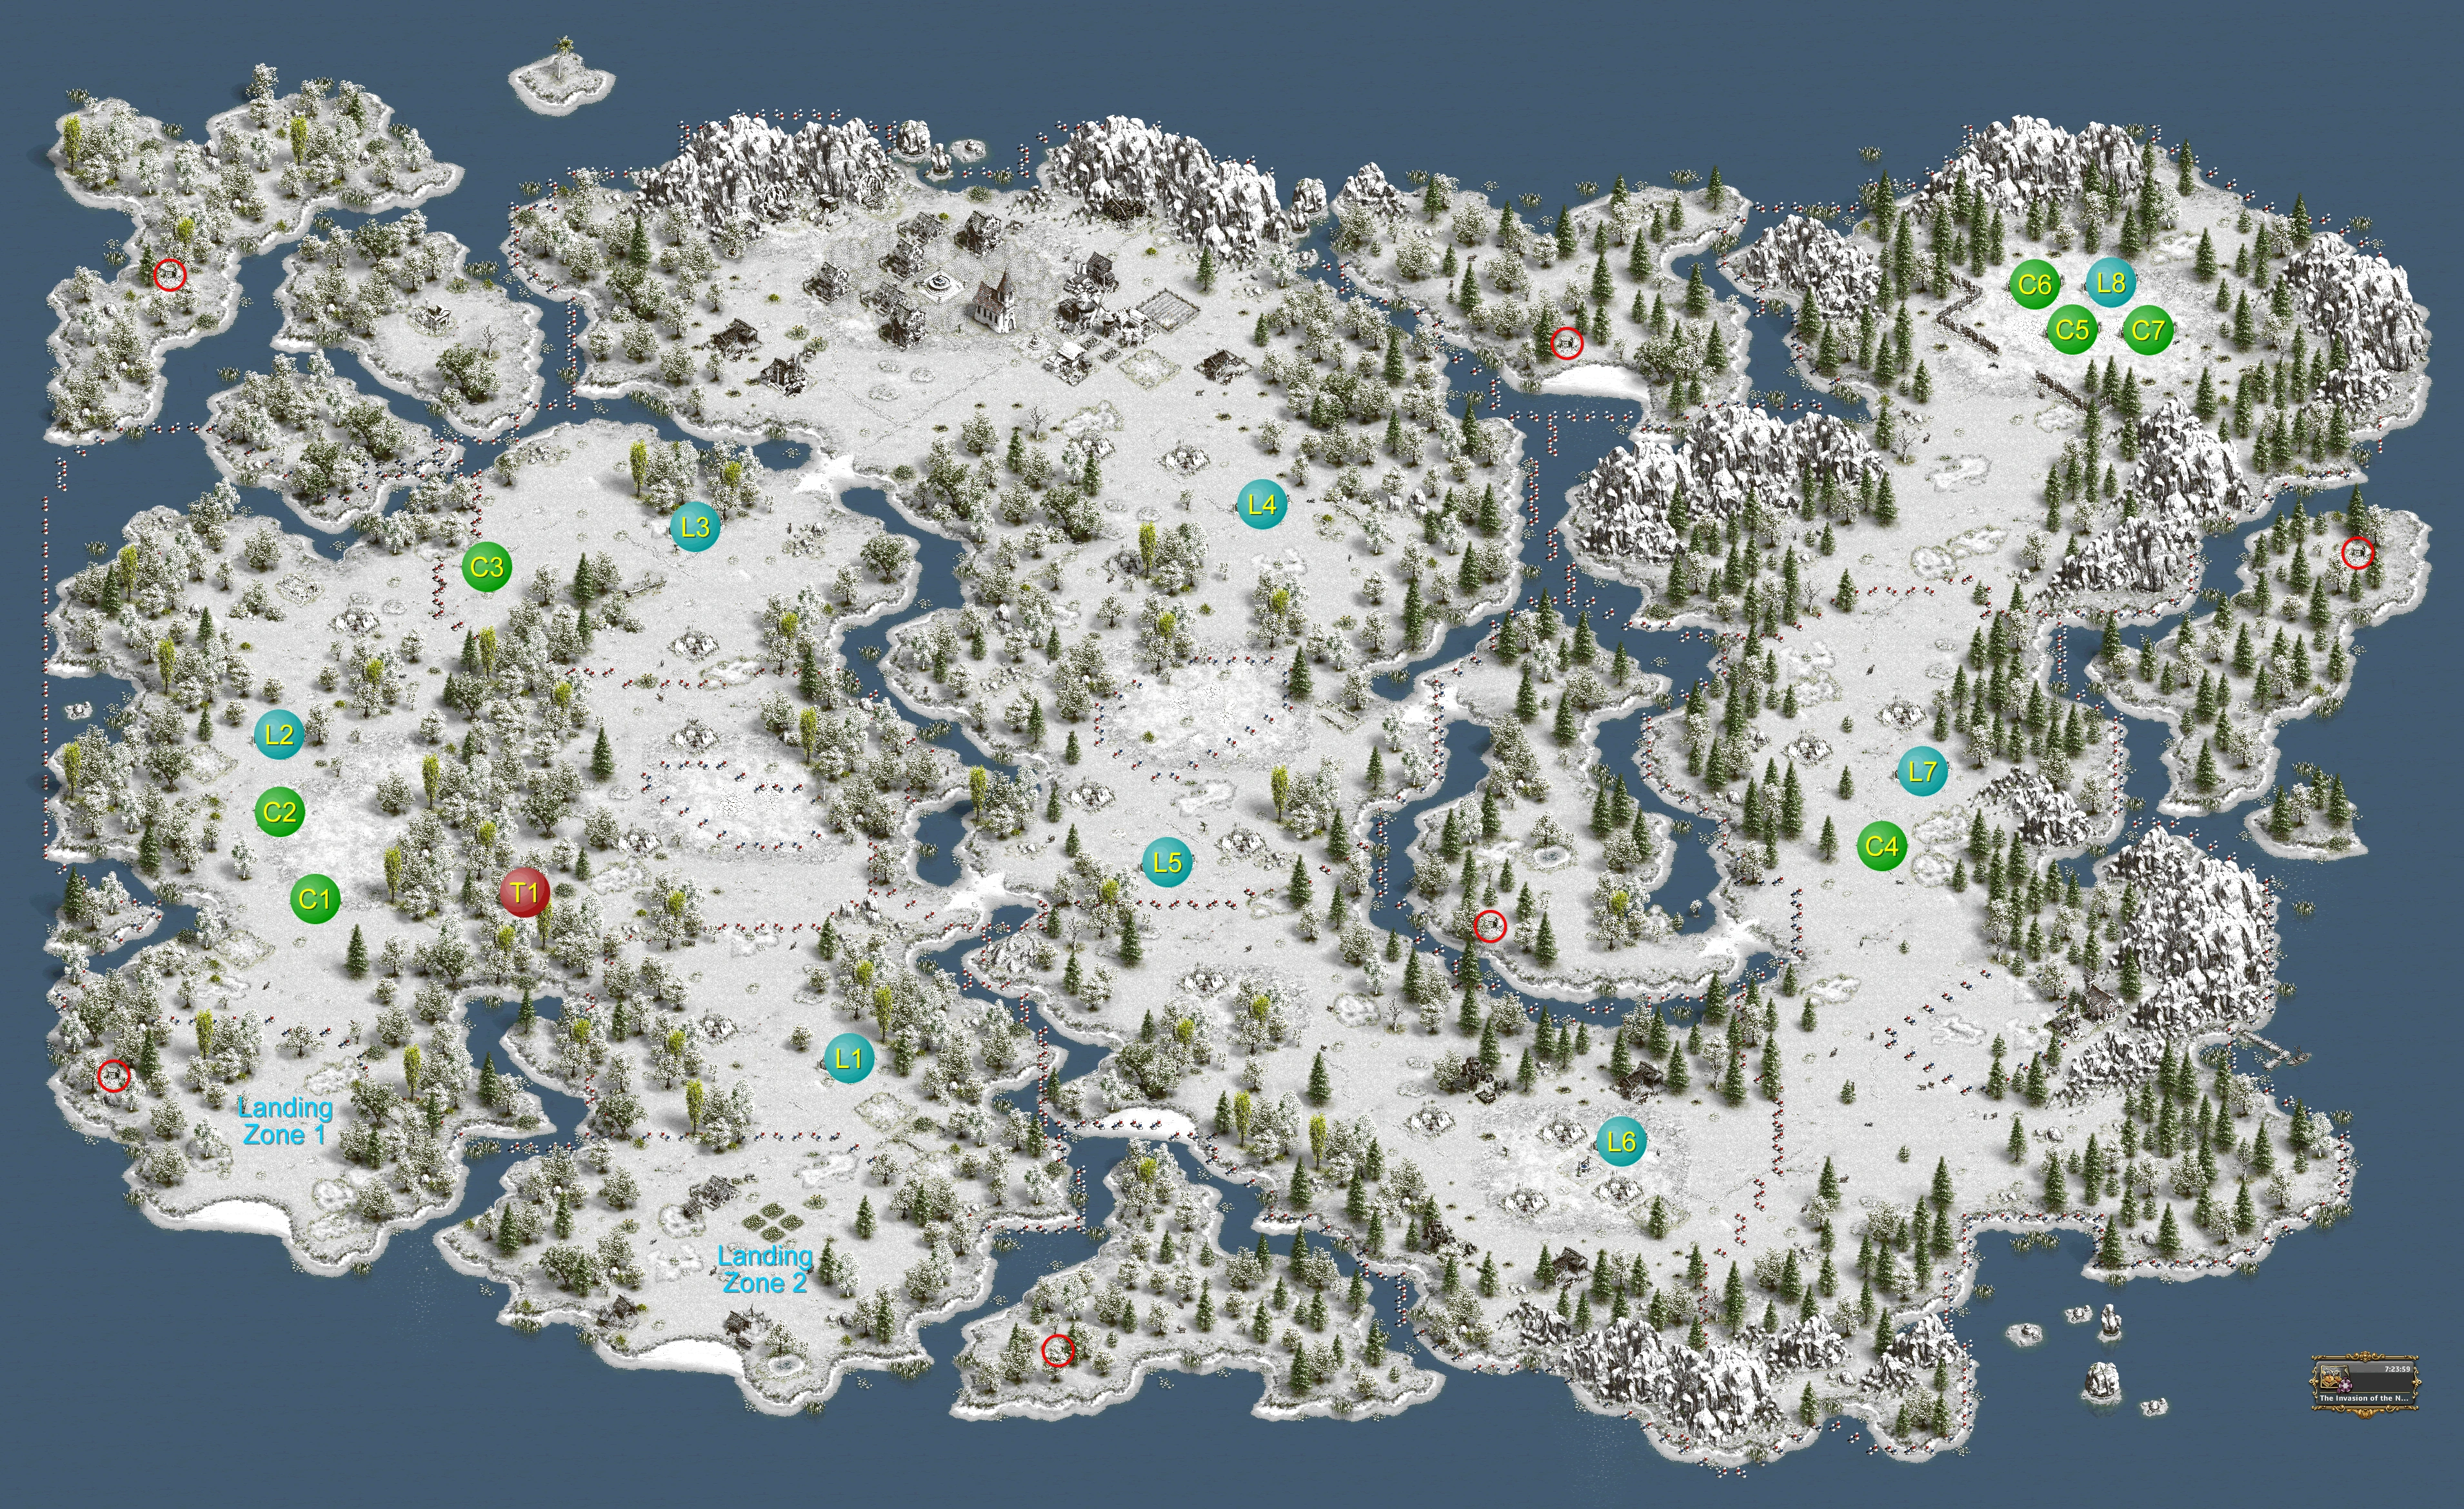
Map of The Island of the Nords
The adventure map allows for many of the Leader camps to be removed with minimal attacks on normal camps, thus reducing losses. There are several 'blue' sectors all over the map from the start, so the guide below can almost be done in any preferred order. The leader camps have a red area of influence in this adventure, so when sending attacks, you only have to ensure you reach the leader's area of influence first.
There are also a number of Expired Wells located around the island which can be clicked on. These are required for the third adventure quest, when you destroy all six to 'bury' pieces of a mystical device.
Quests[]
The following sub-quests are required to complete the adventure.
Note that XP from subquests is not immediately received, but added to the total that you will receive at the end of the adventure.
| Quest | Requirements | Details | Reward |
|---|---|---|---|
| The Mystical Globe | Destroy the camps of the invaders and stop them | The situation is worse than expected! They've taken over the island, and using a mystical item called the Hoarfrost Globe, they've covered the land in ice. What is the globe? It's a mystical item filled with pure frost essence... we need to find it and destroy it! The spy said it's inside one of the many enemy camps. Let's go, we're running out of time! | 1,500 |
| Marching in the Snow | Destroy the camps of the invaders and stop them | This is not good - we're going to freeze here! We need to find the globe and destroy it! Let's battle our way to the next camp! | 1,500 |
| The Hidden Shards | Look for the [6] depleted wells around the island and destroy them. | The leader has broken the globe into six pieces! They have all been hidden inside some old depleted wells around the island! You must find and destroy the depleted wells now! The ice is getting to our bones! | 1,500 |
| The Frozen Core | Destroy the camps of the invaders and stop them | Wait! Our youngest spy has come back, saying there is another part to the globe! The last piece, the core, is in the hands of their leader, Odinom the Cruel! This is it - we need to find him and destroy the final piece! | 1,500 |
Guide Information[]
Note that the following background colours are used in the guide below for different Generals:
| Normal General(max. 200 troops) |
| Battle-Hardened General(max. 200 troops) |
| Veteran General(max. 250 troops) |
| Major General(max. 270 troops) |
The guide below has NO BLOCKING, and is therefore easier for beginners, but not necessarily the most efficient method. You should be able to find guides that have blocking on the official forums.
Where multiple options are available, the first is the recommended one, but others are shown for players who may wish to preserve different troops. The losses are the top of the page are for the recommended options.
Guide[]
| Camp | Bandits | Attack With | Losses |
|---|---|---|---|
| First, move to the second Landing position (see map), to attack the leader camp just north of there. | |||
| Nords Leader 1 L1 |
140 60 | Wave 1: 100 100 Wave 2: 30 170 |
100 100 25 |
| 55 1 194 | 55 | ||
| 32 102 1 115 | 32 102 | ||
| Wave 1: | 203 | ||
| 38 40 1 191 | 38 40 | ||
| Back to Landing area 1 to eradicate the leader camp, L2. Trying to attack from the newly claimed sector will hit the trap, T1, so we won't do that. | |||
| Nords Camp 1 C1 |
150 50 | 30 50 120 | 28 |
| 9 1 60 180 | 9 | ||
| 5 60 185 | 4 | ||
| 75 195 | None! | ||
| Nords Camp 2 C2 |
80 120 | 30 110 60 | 28 |
| 9 1 143 97 | 9 | ||
| 4 1 150 95 | 4 | ||
| 165 105 | None! | ||
| Nords Leader 2 L2 |
40 160 | 18 140 42 | 17 |
| 8 1 200 41 | 8 | ||
| 4 1 200 45 | 4 | ||
| 210 60 | None! | ||
| The next zone has THREE leader camps, and we attack them from different places, so we'll start with L3. Place your general just north of camp C3 for your next attack, which needs a Veteran General. | |||
| Nords Camp 3 C3 |
80 80 40 | 33 52 165 | 31 |
| 33 52 165 | 31 | ||
| Nords Leader 3 L3 |
85 80 35 | 60 50 90 | 53 |
| 90 1 53 106 | 90 | ||
| 40 98 112 | 39 | ||
| 69 1 94 106 | 69 | ||
| Your general should now move to the north-east corner of the area just south of L4, so that he enters the intercept zone for the leader camp, before any other camp. After destroying this camp, the first quest will be completed. | |||
| Nords Leader 4 L4 |
60 80 60 | 60 1 189 | 60 |
| 51 219 | 50 | ||
| Tuck your general into the southern corner of the same area, just north of L5, so that he will be inside the intercept zone for the leader camp as soon as he leaves his camp. | |||
| Nords Leader 5 L5 |
40 120 40 | 55 1 28 166 | 55 |
| 42 1 40 187 | 42 | ||
| After you take L5, the second subquest will be complete, and you will have to find the 6 depleted wells, which are shown on the map above as red circles. You can then continue attacking camps, so put your general in the western corner of the area to the east of L6, where you can also take the following 2 camps. | |||
| Nords Leader 6 L6 |
40 80 60 20 | 44 1 59 146 | 44 |
| 38 1 70 161 | 38 | ||
| Nords Camp 4 C4 |
120 80 | 192 8 | 175 |
| 55 195 | 55 | ||
| 50 220 | 50 | ||
| Nords Leader 7 L7 |
40 120 40 | 60 1 189 | 58 |
| 53 1 216 | 53 | ||
| The final transfer of your general is to the north-east corner, as close as possible to the four remaining Nords camps. Unfortunately, without blocking, you will have to take out each of these... | |||
| Nords Camp 5 C5 |
200 | Wave 1: 200 Wave 2: 100 100 |
200 100 66 |
| 75 1 174 | 75 | ||
| 59 1 210 | 58 | ||
| Nords Camp 6 C6 |
200 | 15 185 | 15 10 |
| 13 1 236 | 13 | ||
| 270 | None! | ||
| Nords Camp 7 C7 |
200 | 172 28 | 130 |
| 4 246 | 4 | ||
| 270 | None! | ||
| Nords Leader 8 L8 |
60 80 60 | 35 17 1 197 | 35 17 |
| 56 1 213 | 56 | ||
Completion Message[]
Done! The Hoarfrost Globe was destroyed, and the Nords will think twice before they try something like that again! Sadly, Odinom the Cruel managed to escape, and I fear this is not the last time we will hear of him. Anyway, it's over! No, don't go yet... you see, we've found a frozen chest inside Odinom's tent. It contains several "interesting" items that we must take back to Capital Island. However, you may keep this one. I'm sure it will be of great use to you. Let this be our little secret.
Rewards[]
The rewards for this adventure appear to be 150% of The Nords, plus a bonus.
The bonus can be:
- Arctic Iron Mine
- Frozen Manor
- Bag of Rainbow Dust